Enjoy free shipping on purchase over $100 within Canada

Master the smokey eye with this easy tutorial. Simple techniques and product tips for creating the perfect smokey eye every time.
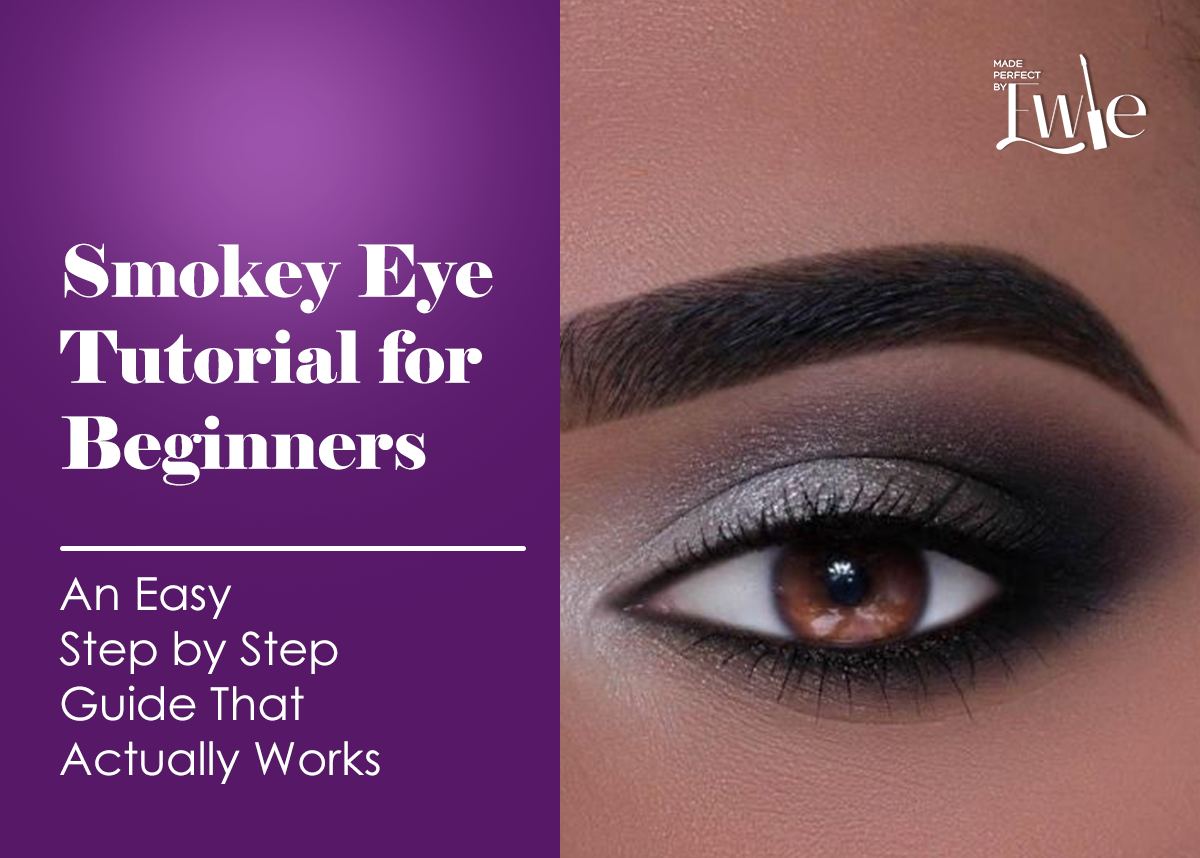
A smokey eye looks dramatic, expensive, and incredibly polished, yet it is one of the most misunderstood makeup techniques. Beginners usually think it requires heavy pigment, harsh black shadow, and intense blending skills. The truth is that the best smokey eyes are surprisingly soft, wearable, and easy to create when you follow the right steps.
This guide breaks the entire look into a simple method that anyone can recreate. You will learn how to choose the right colors, how to blend without creating a muddy effect, how to build depth, and how to avoid the mistakes that make a smokey eye look messy. The Made Perfect eyeshadow palettes are ideal for this technique because they contain smooth neutral shades that blend easily without patchiness.
Let us begin.
A smokey eye needs a clean base or every shade will settle into fine lines. Use a thin layer of concealer on the eyelid and set lightly with a translucent powder. If your lids get oily, add a little eyeshadow primer so the pigments stay in place throughout the day.
The Made Perfect palettes blend beautifully on a primed surface because the shades are soft, creamy and beginner friendly.
Many people jump straight into black shadow and end up with a heavy gritty look. A beginner friendly smokey eye always starts with soft browns and taupes. These shades create depth without overpowering the eyes.
From the Made Perfect collection, any neutral palette with warm brown or chocolate tones works perfectly. Pick three shades:
one light transition shade
one medium depth shade
one darker shade for the outer corner
This is all you need for a beautiful smokey effect.
Use a fluffy blending brush and sweep your lightest brown shade into the crease. Blend it in soft circular motions from the outer corner toward the inner corner. This creates a smooth gradient so every darker shade you add later blends seamlessly.
Do not skip this step. It is the reason most smokey eyes look professional instead of harsh.
Using a smaller blending brush, place your medium brown shade slightly below your transition color. Keep the focus on the outer half of the eye. Blend in gentle upward motions. This step shapes the eye without making the look too dark too quickly.
The neutral brown shades in the Made Perfect palettes spread evenly with little effort. This helps new makeup users achieve a clean gradient without long blending time.
Now pick your darkest shade. It can be a deep brown or chocolate tone. Tap the color on the outer corner of your eye using a small brush. Do not drag it across the lid. Press it in place first, then blend in small circular motions.
This is what creates the smokey intensity while keeping the inner part of the eyelid bright and clean. Beginners often apply the dark color everywhere which leads to a messy look. The secret is to concentrate it on the outer third of the eye only.
To keep this beginner friendly, choose a soft shimmer or matte shade that is slightly lighter than the other colors you used. Place it gently on the center of the eyelid. This catches the light and stops the look from appearing flat.
The shimmer shades in the Made Perfect palettes catch light beautifully without chunky glitter, so they give a smooth reflective glow that enhances the smokey blend.
Take a clean blending brush and run it softly along all visible edges. The goal is to eliminate any sharp lines. The best smokey eyes always have a seamless gradient from dark to light.
If you feel the look is too dark, do not wipe it off. Instead, go back in with your transition shade and blend around the edges to soften it.
Use a brown pencil liner to gently define the lash line. Smudge it slightly with a small brush. This adds depth without making the look harsh. Finish with mascara to lift the eyelashes and complete the style.
A smokey eye looks unfinished if the lower lash line is completely bare. Use your medium brown shade and lightly blend it under the eye. Then add a tiny touch of your darkest shade on the outer part only.
Avoid applying too much pigment under the eye because it can make you look tired. A small amount is enough to create balance.
End the look with a small pop of bright shimmer or matte cream shade on the inner corner of the eye. This keeps the eyes open and awake, especially if you are new to smokey makeup.
A smokey eye does not have to be intimidating. When you use soft browns, build depth gradually, and allow each layer to blend smoothly, the final look becomes effortlessly polished. The Made Perfect eyeshadow palettes give beginners an advantage because the pigments are smooth, blendable, and curated for quick soft glam looks.
With this method, your smokey eye will look clean, confident, and professional every time.
Back To Articles